Saturday, December 18, 2021

Ondeh-Ondeh

 椰丝球


I used to make this snack alongside my late mother-in-law. Making this snack yesterday brought back fond memories. 

Ingredients:

White flesh sweet potatoes 

Tapioca flour

Hot water 

Gula melaka/Palm sugar (click here for info)

Fresh grated coconut (alternative: pasturized grated coconut like this one sold in supermarkets). Around 250g is required for 750g sweet potatoes.

Pandan leaves 


Method:

Prepare grated coconut

1. Cut pandan leaves into short strips and lay them in a tray. Then, spread the grated coconut on the pandan leaves and sprinkle a bit of salt over them. Steam the grated coconut in wok/steam over high heat for 5 minutes. Set aside to cool.


Prepare mashed sweet potatoes

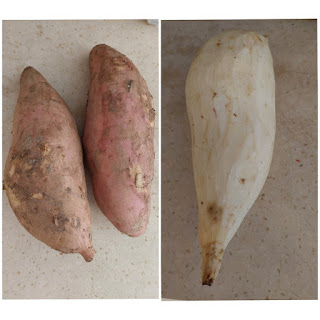
2. Peel the sweet potatoes and cut them into small pieces. Using the same work/steamer, steam them over high heat for 15 minutes or until the potatoes are soft. Pictures below show the white flesh sweet potatoes before and after peeling. They are large, and weighed around 630g each. I got these sweet potatoes and fresh grated coconut from a vegetable stall at ABC Brickworks wet market. These type of sweet potatoes will produce ondeh ondeh with a natural light green hue. There is no need to add pandan extract/juice when making the dough. 


3. Remove the sweet potatoes from wok/steamer and measure the weight of the sweet potatoes. The amount of tapioca flour and hot water will be 20% each of the sweet potatoes. E.g. if sweet potatoes weigh 1kg, tapioca flour will be 200g and water 200g.

4. Mash the sweet potatoes whilst they are piping hot. A few ways of mashing: Large fork, potato masher or back of knife. Cover the mashed sweet potatoes with a plastic wrap to prevent drying.

Prepare pandan-infused water
5. Cut 2 pandan leaves into short strips and boil them in the water (refer to step 3 for quantity). This is to infuse the water with pandan fragrance. Alternatively, you can just use plain hot water.

Make Ondeh-Ondeh dough
6. Add tapioca flour into the mashed sweet potatoes, followed by the pandan-infused hot water, and knead into a dough. Do not add the hot water all at once. Leave 10 to 20g and add to the dough only if the dough is dry. Knead until dough is smooth and pliable. Cover with a plastic wrap and let the dough rest for at least half an hour. 

Prepare filling
7. While dough is resting, shave the gula melaka finely. We will need about 150g for 700g of dough.

Make Ondeh-Ondeh 
8. Pinch a small ball of dough (15g). Use thumb and index finger to form a well in the dough. Spoon gula melaka into the well, then seal the opening and gently roll the dough into a ball using your palms. Repeat for the rest of the dough. Cover the Ondeh-Ondeh with a cloth.

Cook Ondeh-Ondeh
9. Boil a pot of water and gently drop the Ondeh-Ondeh into the water one by one. Reduce heat to medium-low and boil the Ondeh-Ondeh until they float up. Continue to boil for another minute. Then, remove the Ondeh-Ondeh from the water one by one using a small sieve, and place them gently on the tray of grated coconut (from step 1). Roll the Ondeh-Ondeh over the grated coconut, or use a spoon to coat the grated coconut over the Ondeh Ondeh.

Enjoy! This is for you, dearest MIL.


Wednesday, December 15, 2021

Salmon In Creamy Basil Tomato Sauce


This creamy dish is very straight forward to cook. I adapted this recipe from Lieblingsrezepte.


Ingredients

1 salmon fillet

2 tablespoon garlic butter (I use Kerrygold Herb and Garlic butter)

8 cherry tomatoes (cut into halves, then de-seed)

50g baby spinach (more if you like this dish to have more vegetables)

60ml heavy cream

15g parmesan cheese (grated)

Basil (cut into very small/fine pieces)

Parsley (cut into very small/fine pieces)

1/4 salt

dashes of black pepper


Method

1. Remove the skin from salmon fillet and lightly coat the skin with corn flour. Heat a heavy based skillet (I use cast iron skillet) until it is almost smoky.  Put the salmon skin into the pan (no need to put oil) and pan fry the skin until it is light gold brown and crispy. Remove from the pan to serve as topping/side later.


2. Heat the same skillet until smoky again. Fry all sides of the salmon fillet on low-medium heat. There is no need to add oil as the salmon will release a lot of fish oil. Remove the salmon fillet from the pan once cooked.

3. Using same skillet again (medium heat) and the fish oil released from frying the salmon fillet, add the garlic butter. Once it has melted, add the cherry tomatoes and stir fry for a few minutes. Season with salt and pepper. Then add in baby spinach and stir fry until the leaves have wilted. Pour in heavy cream and add parmesan cheese, basil and parsley. Lower the heat and simmer for 2-3 minutes until the sauce has reduced.


4. Return the salmon to the pan, coat the salmon with the sauce and continue simmer for another 2-3 minutes. 

Done! Enjoy!

Wednesday, December 1, 2021

Ode To My Oven

In loving memory of our good old Rinnai built-in oven which has served our family well and finally stood down in November 2021 after eight years. Every week, it has never failed to delight us with all the bakes, roasts and grills we cook in it. Alas, all good times must come to an end - the thermostat malfunctioned, oven bulb burst and power trips occurred when the oven is in operation.  Adieu, our faithful Rinnai oven. We will miss you.

The new Electrolux built-in oven joined our family two weeks ago. It is time to get to know the new oven so that it can delight us with our family's favourite baked/roasted/grilled food. Welcome to our house, Electrolux oven.


Tuesday, November 30, 2021

Sweet and Sour Chicken


When I harvest brinjal (also known as eggplant, aubergine) from my balcony garden, I will definitely cook this Japanese Sweet and Sour Chicken. Serve with rice and it will become a complete meal as this dish has chicken and loaded with many types of vegetables. I've even cooked a 'vegetarian' version i.e. without the chicken and it tasted just as good. The lotus roots are crunchy; potatoes, carrots and brinjal are soft and tender; bell peppers are sweet; and the chicken remained surprisingly crispy even after coated with vinegar sauce. I've adapted the recipe for this very colourful dish from Just One Cookbook.

Ingredients
1 chicken thigh (with skin, about 290g)

Marinade for chicken:
1 tablespoon soy sauce
1/2 tablespoon sake
1 teaspoon grated ginger
1 teaspoon grated garlic

Vegetables:
3 medium sized potatoes
1 section of lotus root (300-400g, I buy those that are coated with wet mud as these are tastier)
1 carrot
1 brinjal
1 large onion (cut into wedges)
1 green/red/yellow bell pepper/capsicum (cut into wedges)

Vinegar sauce:
2 tablespoon sugar
1 and a half tablespoon apple cider vinegar
1 tablespoon soy sauce
Half tablespoon rice vinegar (Just One Cookbook's recipe calls for black vinegar but I don't have it in my kitchen. So I replaced with rice vinegar)
Half tablespoon mirin
Half tablespoon water
Half tablespoon sake
1 teaspoon potato starch
1 spoonful of love 

Method
1. Clean chicken thigh and cut into small pieces. Marinate it for at least half hour.

2. Cut the vegetables to small pieces/wedges. For root vegetables like carrot and potatoes which take longer to deep fry, boil them first until they are tender (about 5-10 minutes), and then drain and set aside.

3. Deep fry the vegetables until the edges are light golden. Set aside.

4. Coat the chicken pieces in potato starch just before deep frying. Deep fry in batches until they are nice golden brown in colour. Drain and set aside. 

5. Remove the oil left from frying vegetables and chicken. Heat the wok and put all the vegetables and chicken into the wok. Stir fry over medium heat until they are evenly heated. Pour the vinegar sauce over the vegetables and chicken, stir fry to combine for one to two minutes.


6. Transfer to a big bowl or plate and serve.


Sunday, November 28, 2021

Baked Sea Bass in Butter and Garlic

 烘烤鲈鱼


Enjoy restaurant quality baked sea bass in the comfort of your home. This delectable dish is very easy to cook. Do give it a try if you love garlic and butter. This recipe serves two. 


Ingredients

1 fresh sea bass fillet, about 170g to 200g  (do not buy farm-bred ones which carry a mud taste)

4 cloves of garlic (peeled)

2 tablespoon olive oil (I use cold press extra virgin olive oil)

20g unsalted butter (cut into thin slides)

1/4 teaspoon salt

Dashes of freshly ground black pepper

1 tablespoon white wine

1 spoonful of love


Method

1. Place garlic cloves in a small pot and add olive oil. Cook the garlic cloves over very low heat in the stove until the garlic cloves are tender and cooked through and lightly caramelized. Takes about 15 to 20 mins. Remove from heat and let the garlic cloves cool down to room temperature.

2. Rub both sides of the sea bass with olive oil (from cooking the garlic cloves), salt and black pepper.

3. Place the sea bass in a baking dish with the skin side facing up.

4. Place the butter slices on the skin.

5. Mash each garlic clove by pressing them between your thumb and index finger, and spread it on top of the butter.


6. Drizzle white wine into the dish and bake the sea bass in the pre-heated oven at 190 deg cel for 10 mins.

7. Remove from oven and baste the sea bass with the liquid (from the fish, white wine and butter) in the baking dish. Drizzle a bit of lemon juice over the sea bass, top with parsley / micro greens (if available) and serve hot.

Enjoy!

Saturday, November 20, 2021

Nasi Ayam Penyet (Indonesian Smashed Fried Chicken Rice)

 印尼炸鸡


This is a very popular dish in Indonesia and widely found in Singapore's hawker centre and food courts. Ayam means "chicken" and Penyat means "Smashed" in Bahasa Indonesia. We went to a new food court for lunch two days ago and tried the Ayam Penyet there. It was very tasty, and I quickly search for its recipes. There are many versions and I adapted the recipes from Lisa's Lemony Kitchen and honest-to-goodness. I did not include recipe for sambal (chilli sauce/paste) as my family does not take spicy food.

Ingredients A 


1 chicken (cut into 4 pieces)

2 bay leaves

3 lemon grass (white part) - crush/smash it

2-3cm blue ginger (galangal) - crush/smash it

3 kaffir lime leaves - remove center vein

1 litre water 

2.5 teaspoon salt

1 teaspoon sugar

Spice paste (12 shallots, 5 garlic cloves, 4 candlenuts [optional], 1/4 teaspoon tumeric powder, 1/4 teaspoon coriander powder)

1 spoonful of love


Ingredients B 

50g rice flour

10g corn flour

1/2 teaspoon baking powder

100ml chicken broth


Sides which you can serve with this dish:

Tau Kwa/firm tofu - can fry using the same batter

Tempeh (fermented soybean) - can fry using the same batter. Click here to know more about tempeh.

Vegetables e.g. cucumber


Method

1. Prepare spice paste. I use a mortar and pestle to pound all the spices. You can use a blender.

2. Put all the ingredients A in a big pot and bring to boil. Then simmer for 1 hour until the water is reduced to half.

3. Remove chicken pieces from the pot and let the chicken and the chicken broth cool completely.

4. Prepare batter using ingredients B. The chicken broth is from above steps and should be cooled to room temperature before mixing with the batter. The batter is liquid in consistency. 

5. Cook rice as per normal but using the cooled chicken broth. I added a bunch of pandan leaves to make the rice more fragrant.

6. Smash each piece of chicken (I use pestle to do it). 


7. Dip the smashed chicken into the batter and deep fry until light golden in colour. 


8. Turn up the heat in the fryer/wok to approximately 180 degree celcius. Fry the chicken pieces again until nicely brown. This will take about 20seconds for each piece. Place the fried chicken on wire rack to cool.


9. Serve the fried chicken hot with rice and sides. 


Wednesday, November 17, 2021

Japanese Souffle Cheesecake

日式舒芙蕾芝士蛋糕


Souffle cheesecake originated in Japan and I recall that the first of such cake to sell in Singapore was under the brand 'miki ojisan'.

I baked this cheesecake last week. It has a pillowy soft, cottony texture and tastes best when chilled. 

Ingredients

Cream Cheese   160g (room temperature, take out from fridge at least half hour before baking starts)

Fresh milk         50g

Unsalted butter  20g

Cake flour          40g

Large eggs          4

Sugar                 70g

1 spoonful of love


Method

1. Separate the yolks from whites and keep the whites in fridge until ready to whisk (step 6)

2. Put butter and cream cheese in a mixing bowl, and place it over a pot of hot water. Then whisk to combine these two ingredients until you get a smooth mixture.

3. Add milk to the cream cheese mixture and whisk to combine. Remove the mixing bowl from the hot water.

4. Sieve in cake flour and whisk to combine.

5. Add in egg yolks (all 4 of them) and whisk to combine.

6. Make meringue. Whisk egg whites using electric mixer or hand whisk and add in sugar in 3 batches. Stop whisking when you reach soft peaks i.e. the egg white peak bends a little when you lift the whisk.

7. Take 1/3 of the meringue and whisk gently into the cream cheese mixture (from step 5). Then pour the cream cheese mixture into the remaining meringue, and use spatula to fold quickly but gently.

8. Pour into baking pan (lined with parchment paper). I use a 20cam square pan. Tap the pan on the bench/table top a few times to remove air pockets.

9. Place the baking pan in a bigger baking tray/pan that is filled with water up to 2cm of the souffle cheesecake baking pan. Bake in 150 deg cel preheated oven (top and bottom heat, no fan) for 30mins, open the oven door fully 5 seconds, then lower the oven temperature to 100 deg cel and continue to bake for another 30mins. Every oven is different, so do adjust the baking temperature and timings accordingly. 

10. Leave the cake in the oven (door open) for 5 mins. Then remove the cake from the baking pan and place it on cooling rack. Chill the cake when it has cooled completely and enjoy!


Sunday, November 7, 2021

Pandan Chiffon Cake

 斑斓戚風蛋糕


This recipe produced the best chiffon cake that is very soft and moist! I adapted from oladybakes who uses the cooked dough (烫面) method where the flour is slightly cooked in hot oil.

Ingredients

60g cooking oil (I use sunflower oil / coconut oil)

100g cake flour (I use Prima top flour)

4 egg yoks

5 egg whites

1 tsp fresh lemon juice (you can replace with 1/2 tsp cream of tartar if you have it)

70g caster sugar

1 tsp of pandan extract

95g coconut milk

1/4 tsp salt

1 spoonful of love


Method

A. To make pandan extract:

I have ready access to pandan leaves as I grow my own pandan plant. Blend 2 bundles of pandan leaves (about 12-15leaves) with 200ml water, squeeze the pulp and filter the pandan water using a fine mesh sieve. Store the pandan water in a container and keep in fridge for at least two days for the pandan extract to settle to the bottom of the container. The thick dark green sediment (see red arrow) is the pandan extract.


B. To make chiffon cake:
1. Stir pandan extract and salt into coconut milk and set aside.
2. Heat up the oil to 60+ deg cel. Add sieved cake flour and use a whisk to combine. Add the pandan coconut mixture (step 1) and whisk to combine. Add in the egg yolks one at a time, and whisk to combine. You will get a smooth and thick batter like this:


3. Use hand or stand mixer to whisk the egg whites, lemon juice and sugar (add in 3 batches) to stiff peak.

4. Take 1/3 of the meringue and whisk into the batter (step 2). Then pour the batter into the meringue and use spatula to fold in gently but quickly. 

5. Pour into cake tin and bang the tin a few times on table top to remove air pockets in the batter. Bake at 150 deg cel (top and bottom heat, no fan) for 30 - 35 minutes. Each oven is different, so please adjust baking temperature/time accordingly.

6. Invert the tin to cool the cake. Unmould the cake and serve.

Note to self:

- step 2, when pandan coconut mixture is added, the mixture will become thick and paste-like.

- step 5, 20cm cake tin 


Monday, October 18, 2021

Char Siu

 叉烧


I have made countless char siu using this recipe and am pretty sure you will love it, just like my family. 

The ingredients for the marinade, while it looks long, are readily available in my kitchen. I don't have to buy bottles/tubs of red fermented beancurd specifically for this dish! Most importantly, this recipe does not use food colouring, oyster or hoisin sauce (which contains MSG monosodium glutamate, food flavoring and preservatives).

There are two ways to make this dish: roasting/grilling in oven and cooking over the stove.

Ingredients

1.2kg pork (I requested butcher for 不见天, a cut of meat around the pig's armpit which has good amount of fat. Slab of pork belly will do too)

2 teaspoon molasses

1 teaspoon sesame oil

1 teaspoon salt

1 teaspoon dark soy sauce

2 tablespoon honey

2 tablespoon sugar (I use jaggery)

1 tablespoon chinese wine (I use 绍兴花彫酒)

1/4 teaspoon five spice powder

4 cloves of garlic (chopped finely or minced/grated)

1 teaspoon paprika (optional)

2 tablespoon warm water

1/2 piece fermented tofu (optional)

1 tablespoon fermented tofu juice (optional)

1 spoonful of love


Method (Roasting/Grilling in Oven)

1. Slice the pork into strips of 1.5 to 2 inch wide.

2. Use the sharp tip of the knife to poke the meat lightly to help the meat absorb the marinade.

3. Combine all the ingredients with the pork and marinade overnight in fridge.

4. The next day, take the pork out from fridge half hour before roasting*. Preheat oven to 200 degree celsius. Keep the remaining marinade to baste the pork during roasting later.

5. Line baking pan with aluminum foil and place a wire rack (I use two steaming racks) on the pan. Then lay the pork on the wire rack and pour some water to the bottom of tray. 

6. Roast (fan mode) at 200 degree celsius for 15 minutes. Then flip the pork over, baste marinade and roast for another 15 minutes. Try: 200C for 20mins, flip and baste every 5 minutes.

7. Add 1 tablespoon maltose (substitute: honey) to the leftover marinade and mix until dissolve. Once the pork has been roasted for 30minutes, brush the marinade all over the pork and grill for 5 minutes. Repeat the basting and roasting (for 5 minutes) until the char siu is charred to your liking. 


8. Rest the char siu for 15 minutes before slicing them and serving.


Method (Cooking Over Stove)

1. Heat up wok with 2 tablespoons of cooking oil. Then place the pork into the wok including all the marinade. Simmer for 40-45minutes until the pork is tender. The marinade should thicken.

2. Remove the marinade from the wok, raise the stove heat to medium and sear the sides of the pork until they are nicely charred. This should take not more than 5 minutes.

3. Add 1 tablespoon maltose (substitute: honey) to the leftover marinade and mix until dissolve. Brush the marinade all over the pork.

4. Rest the char siu for 15 minutes before slicing them and serving.


Sunday, October 17, 2021

Hainanese Pork Chop

 海南猪排


This recipe serves 3.

Ingredients
450g pork fillet
1 tablespoon hua tiao wine (chinese cooking wine)
1 tablespoon light soy sauce
1/4 teaspoon salt
Dashes of white pepper
1 egg (lightly beaten)
6 pieces of cream crackers 
1 spoonful of love


Method
1. Beat the pork fillet with the back of the knife or a meat mallet to thin them out.


2. Marinate the pork with hua tiao wibe, light soy sauce, salt, white pepper and egg for at least 20 minutes.


3. Grind the creM crackers to fine crumbs. I use a mortar and pestle to do it - this was what my mum taught me!


4. Heat oil in wok/frying pan to 160 degree celcius.

5. Coat the pork fillet with the cream cracker crumbs. Slide it into the hot oil and fry until light golden. Transfer the pork fillet to a wire rack to drain excess oil. Scoop up the crumbs from the oil using a fine mesh sieve before you fry tge next piece of fillet. Repeat until all fillets are cooked. 


6. When all the fillets have been fried, turn up the heat for the stove and heat the cooking oil to approximately 180 degree celcius. Fry the fillets again until nicely brown. This will take about 20seconds. Place the fillet on wire rack to cool and drain excess oil.

7. Slice the pork choos and serve whist they are hot abd crispy.


Saturday, October 16, 2021

Mushroom Risotto


This is an Italian dish made with arborio/risotto rice. It is an easy all-in-one meal which can be cooked in half hour. 

Ingredients

120g arborio/risotto rice (don't rinse the rice as that would remove the starch from the rice which helps to make it creamy)

300g portobello mushrooms (sliced)

600ml vegetable stock (onion, celery, carrot, mushroom stems, dried porcini mushrooms, bay leaves) - keep the stock hot

1 tablespoon heavy/double cream

45g unsalted butter

1/2 large onion (diced)

2 garlic cloves (diced)

2 tablespoon herbs (e.g. thyme, dill, parsley)

100ml white wine (can replace with the stock and 1 teaspoon of lemon juice)

2-3 strips of smoked bacon (cut into 1cm strips) as toppings. This is optional.

1 spoonful of love


Method

1. In a deep saucepan / pot, lightly saute the onion, garlic and 1 tablespoon herbs in olive oil and 15g butter. 


2. Add risotto rice and stir the rice under medium heat until the rice is coated with the oil.


3. Add white wine and stir the rice until the wine has been absorbed.

4. Lower the heat to medium-low and add one ladle of hot vegetable stock into the rice. Stir the rice until the stock is absorbed. Repeat this process (about 20 minutes) until the stock is used up.

5. While cooking the rice (step 4), pan fry the bacons in a little olive oil until the sides are slightly crispy. Remove the bacons from the pan and stir fry the mushrooms in the bacon fat. Add 15g butter, dashes of black pepper and salt, and continue to stir fry until the bacon fat and butter are absorbed into the mushrooms.  


6. Remove the saucepan / pot from the heat when the rice is tender but still a little bit hard in the center. Rest the rice (covered with lid) for 5 minutes as it continues to cook in residual heat.    

7. Stir in mushrooms, followed by heavy/double cream and remaining 15g butter. Stir in grated cheese (optional).

8. Serve the risotto hot with bacon topping.