Tuesday, March 29, 2022

How to make Crispy Lard And Lard Oil

猪油渣


Here is how I make pork lard that are super crispy and crunchy, and stay crisp longer.

Ingredients

200g fresh Indonesian pork lard 

Pinch of salt

Water


1. Lightly rinse the pork lard with water. Cut into cubes if your butcher had not done so.

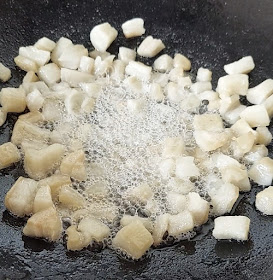
2. Put pork lard cubes into wok and add just enough water to cover the pork lard. Add salt. Quick stir to mix the salt into the water. Turn on the flame to medium heat and boil the lard cubes until all the water has evaporated. At this point, reduce heat to low to slowly render the pork fat. Pork fat will be bubbling away as it is released from the lard cubes. 


3. Once the lard cubes turn light golden brown (you will also see that the bubbles have reduced significantly), increase the heat to high for last 20-30seconds. Turn off flame. 

4. Transfer the lard to a plate laid with kitchen towel to drain excess oil. Once cooled, keep in air tight container. When the lard oil has cooled, filter it and store in container for use later.


Monday, March 28, 2022

Tea Leaf Smoked Chicken

茶叶熏鸡


Tea leaf smoked chicken is a super-straight forward dish which you can cook at home using simple equipment and ingredients. The delicate smoke flavour infused into the chicken will definitely wow your family as it did for mine. 

Based on this website, the tea smoke mix comprises dried tea leaves (for flavour and aromatics), raw/uncooked rice (to moderate the burn off of the tea leaves) and sugar (to help the smoke penetrate and adhere to the food). 


Ingredients:

8g dried tea leaves (I use oolong tea leaves)

30g raw/uncooked rice (alternative: 4g dried osmanthus flowers, guihua,  桂花 )

12g sugar 

1 kampong chicken (approximately 1.2kg)

2 teaspoon salt


Method:

1. Wash and clean the chicken. Then butterfly it by cutting the chicken into two from the backbone. Marinate it with salt for at least 3 hours.

2. Place the chicken on a steaming rack, and put the rack in a dish/tray to collect the chicken juices (to make stock). Steam for 30 minutes on high heat. Remember to monitor the water and top up if required. 

3. In the meantime, prepare the tea smoke mix by combining dried tea leaves, raw/uncooked rice and sugar. Cut out aluminum foil of 40cm length, and lay it on the bottom of the wok. Spread the tea smoke mix evenly on the aluminum foil.

4. Place the steamed chicken including the steaming rack on the aluminum foil. Cover the wok with lid and turn the stove/burner on high heat. When smoke appears, reduce heat to medium and set timer to smoke chicken for 8 minutes. 


5.  Rest chicken for 10 minutes before cutting it up to serve. 

Sunday, March 27, 2022

Orh Kueh (Steamed Yam/Taro Cake)

芋头糕


I love to eat yam cake but store bought ones hardly have any yam inside. Here is my homemade yam cake recipe which is adapted from Kitchen Tigress and Lucinda Lau. It is packed with have lots of chunky yam pieces, mushrooms, dried shrimps and sometimes I added ginkgo nuts. So savoury and delicious, I can have it breakfast, lunch and tea break.

Ingredients

500-600g yam 

200g rice flour

45g tapioca flour (or wheat starch)

840ml water (including water for soaking dried shrimps and mushrooms)

20g dried shrimps

20g dried shiitake mushrooms

100g shallots

1 teaspoon minced garlic

Toppings: fried shallots, spring onions, red chilli, roasted white sesame seeds, coriander


Method

1. Line the steaming tray with parchment/baking paper (optional).

2. Soak dried shrimps for at least half hour. Chop the shrimps into smaller pieces. Retain the water for soaking dried shrimps.

3. Soak dried mushrooms until they are rehydrated. Squeeze the water from mushrooms, then thinly slice the mushrooms. Retain the water for soaking mushrooms. 

4. Mix the rice flour with tapioca flour in a mixing bowl. Add in 440ml of water and stir until you get a smooth mixture (i.e. no lumps), and set aside. 

5. Top up the water from soaking dried shrimps and mushrooms to make 400ml, and set aside. 

6. Cut the yam into small cubes. Note that yam contains calcium oxidase which causes skin irritation. If your skin is sensitive, you may want to wear gloves while handling yam.


7. Cut shallots into thin slices. Heat up wok and fry shallots over low heat until golden brown. Transfer the fried shallots to a plate.

8. Using the oil from frying shallots, fry garlic and dried shrimps over medium heat until fragrant. Add mushrooms and continue to stir fry. Add seasoning (1.5 tablespoon soy sauce and dashes of white pepper) and mix evenly. Add the yam cubes and fried shallots (keep 2 tablespoon as topping) into the wok and stir fry the yam for 2 to 3 minutes until the yam cubes are soft. Pour in 400ml of water (from step 5) and stir to combine. Bring to boil and simmer under low heat for 5 minutes. Turn off fire. Note: seasoning is deliberately light so as not to overpower the frangrance of yam)

9. Take the flour mixture (from step 4), stir it for a few seconds and pour it into the wok. Quickly stir to evenly mix the flour mixture with yam. The mixture will be very thick.

10. Transfer the yam to steaming pan and use spatula to level the mixture. Steam over high heat for 40minutes and remove from steamer when done. Check and top up water in wok/steamer accordingly. It is ready when you insert a skewer into the yam cake and it comes out almost clean. Cool down completely before cutting or un-moulding from pan.


11. Garnish with toppings (optional) and serve. 


Wafu (Japanese Style) Pasta

 日式意大利面


This meal is easy to prepare in under 15 minutes. It is a big favourite for my children.

Ingredients:

100g spaghetti (for 1 pax)

2 strips of smoked bacon

2 cloves garlic (smashed)

1/2 tablespoon butter

1/2 tablespoon shoyu (Japanese soy sauce)

Shredded noni seaweed (any desired amount)

Spring onion (for garnish, optional)


Method:

1. Boil approximately two litres of water with 1 teaspoon salt. Once boiling, add spaghetti and cook according to instruction on package. Drain and set aside once cooked. Reserve two tablespoons of the water.

2. Cut bacon into strips of 1cm in width. Heat up wok with 1 teaspoon olive oil, and lightly fry the bacon. Push the bacon to the side (or remove from wok) and fry garlic in the oil. Once garlic is lightly browned, add in the spaghetti. Add butter, shoyu and reserved water (from step 1) and toss with a pair of long chopsticks for a few minutes.


3. Garnish with shredded noni and spring onions, and serve hot.

Thursday, March 24, 2022

Homemade Soy Bean Milk

 浓豆浆


Making soy bean milk at home is actually not difficult. Yes, it takes time and effort but once you have tried making it, you will very likely not buy store bought ones because homemade soy bean milk is so much creamier and fragrant.

Ingredients:

260g soy beans

1 litre water (for soaking)

2 litre of water (for blending)

a bunch of pandan leaves

2 tablespoon rock sugar (omit if you prefer un-sweetened soy bean milk)


Method:

1. Rinse soy beans and soak them with water for at least 5-6 hours or overnight (refrigerate if overnight).

2. The soya beans would have expanded 3 times. Rub the beans with your hand to remove the outer skins as much as you can.


3. Top up the water so that the skins float and remove them using a sieve.


4. Discard the water (you can use it to water your plants). 

5. Blend soy beans with 1 litre water until smooth. Depending on size of your blender, you may have to do in batches.


6. Strain the blended soy bean mixture through a coffee sock and hand squeeze the raw milk out. 


7. Put the soy bean pulp back into the blender and blend with the remaining 1 litre water. Repeat step 6.

8. Wash the coffee sock and strain the raw soy milk again (for a smoother texture) before transferring the milk into a big pot (preferably heavy bottom pot so that heat is dispersed more evenly). Skim off the foam.  Bring it to a boil over medium heat, stirring with a wooden ladle (to prevent milk sticking to the bottom of pot) and continue to skim off foam. Watch the heat carefully as the foam may overflow the pot especially if the pot is shallow/small. Once boiled, lower the heat, add pandan leaves and simmer for 15 minutes.


9. Remove the pandan leaves and add rock sugar. Serve when the soy bean milk has cooled.


Wednesday, March 23, 2022

Cantonese Crispy Noodle (Sang Meen)

广府生面


Zi char or Cze char, is Hokkien for cooking (煮) and frying (炒). In Singapore, zi char stalls are where families and friends gather to enjoy affordable dishes that are cooked to order in a wok. Cantonese Crispy Noodle is a classic zi char dish which you can actually cook at home. Here’s how you can do it:


Ingredients:

2 bundles of fresh wanton noodles (Serves 3 pax)

2 cloves garlic (chopped finely)

9-10 Fresh prawns (de-shelled, de-veined and rinsed in a bowl of water that is lightly salted, about 1/4 teaspoon)

100g Pork slices (marinated with 1/4 teaspoon salt, dashes of white pepper and 1 teaspoon corn flour)

200g Mustard greens (washed and cut into segments)

400g water (add more if you like more sauce)

Crispy pork croutons as toppings (optional)


Method:

1. Heat up sufficient oil in wok until it very hot (almost smoking). Loosen the bundle of noodles, shake off excess flour and arrange half into the shape of a dish. Gently lower the noodles into the hot oil and fry until golden brown and crisp. Note that the noodles will absorb the oil and puff up very quickly. Remember to flip the noodles so that the noodles will be evenly fried. 


2. Next prepare the sauce. Heat up wok and sauté garlic until fragrant. Add pork and prawns and stir fry over high heat until just cooked. Remove pork and prawns from wok. Add water and bring to boil. Add seasoning (1 teaspoon fish sauce, 1 teaspoon Worcestershire sauce) followed by vegetables, prawns and pork slices. Simmer for a few minutes. Lastly, thicken sauce with corn starch. Pour sauce over crispy noodles, topped with crispy pork croutons and serve hot!


Tuesday, March 15, 2022

Pineapple Tart

 黄梨挞 /   凤梨酥


Pineapple is called "Ong Lai" in Hokkien dialect, literally translated as "Prosperity Come". To welcome Chinese New Year, many Chinese families would thus love to have pineapple tarts. These tarts are symbols of prosperity, good luck and good fortune. 

Homemade pineapple tarts are the best as we can control the sourness or sweetness of the pineapple jam, as well as how buttery we want the pastry crust to be. Here is my version of buttery and melt in the mouth pineapple tarts.

Pineapple Jam 

(one fresh ripe pineapple makes 6g fillings for about 30 tarts)

(2 pineapples weighing 2.44kg makes 461g jam.)

Cut the pineapple skin and remove the 'eyes' from the flesh. Cut the pineapple into big wedges. Do not cut away the core or hard stem in the centre at this moment as it will facilitate grating.


Grate the pineapple and discard the core/hard stem.

Cook the pineapple flesh together with the juices in a wok over medium-low heat. I did not add spices like cloves or cinnamon as I just want pure pineapple fragrance. Stir from time to time until the juices have reduced. Once 75% of the juices have evaporated, add rock sugar or granulated sugar according to how ripe the pineapples are (approximately 30g to 50g per pineapple), and stir the pineapple flesh frequently to avoid burning the jam. Note: Optionally, can add lemon juice which acts as a natural preservative (around 1 tsp per pineapple) and/or maltose (1 tsp per pineapple). Once the jam has thickened (i.e. can stick to the spatula) and golden brown in colour, the jam is done. It takes about 2.5 hours (from cutting, grating to cooking) for the pineapple jam to be ready. Store the jam in a sterilised air tight container once it has completely cooled down.


Roll the jam into balls of 6g each, and keep in fridge.

Note: Because homemade pineapple jam does not contain preservatives and usually uses lesser sugar, they cannot last too long. So it is best to make the jam as well as the pineapple tarts one week before Chinese New Year.


Pineapple Tart Pastry

Ingredients (makes about 35 tarts of 10g dough each):

125g unsalted butter (soft to the touch, around 20 degree celcius) - I use Golden Churn brand butter.

180g plain flour

10g corn starch (1 tablespoon)

1 egg yolk (15g)

20g icing sugar

1/8 tsp salt

1 spoonful of love

Method:

1. Sieve plain flour and corn starch together and set aside.

2. Whisk the butter in mixing bowl, then add icing sugar and whisk until the butter is pale/white in colour. This takes about 2 to 3 minutes of hand whisking.

3. Add salt and egg yolk, and whisk until just combined. 

4. Add in sieved flour and use spatula to mix using cutting and folding motion. Stop mixing when there are no more flour. Lift dough and throw back into mixing bowl for 5 times. Overmixing will cause the dough to be hard. Lightly press the dough with your finger, and if it does not stick to your hand, rest dough in fridge for 30mins and it is ready. From here, you can either do an open faced pineapple tart or round shaped (ball) tarts.


Open Faced Tarts

5a. Place the dough on a lightly floured bench, and roll it to 5mm thickness. Lightly flour the pineapple tart cutter, cut the dough carefully and place in a baking tray. 

6a. Egg wash the tarts and bake them at 180 degree celcius for 10 mins. Remove from oven and place the balls of pineapple jam on each tart. Return the tray to the oven and continue to bake for another 10 mins. Once the tart is golden in colour, remove the tray from the oven and lightly press on the pineapple balls so that the jam will stick to the tart.


Round Shaped Tarts

5b. Weigh the dough and ensure each is 9g each. Roll into ball, flatten it and place the pineapple jam ball in the middle. Bring the edges of the dough together and seal. Gently roll it in between your palms to shape it into a ball. Optional: Score criss-cross pattern to resemble pineapple skin on the ball using scrapper to make them look like pineapples!

6b. Bake the tarts at 160C (fan mode) for 8minutes. Then, glaze the top of the tart with egg wash (1 egg yolk + 1 teaspoon of milk or half teaspoon cooking oil) and bake at 150C for another 10-12minutes (without fan mode) or until tarts are golden brown.


7. Cool completely before storing the tarts in containers. To prevent the tarts from sticking to each other, lay a piece of baking paper liner between each layer of tarts.


For nastar shape:

  1. Put the dough into nastar piping tip, and then press out into a strip of 5cm length. 

  2. Place pineapple filing at one end and roll up the pastry, as in a Swiss roll, enough to enclose the jam. Do not overlap the pastry. Cut off the excess pastry.