Showing posts with label Pastry. Show all posts

Monday, May 8, 2023

Choux Cream Puff

泡芙

Very time consuming to make these cream puffs. But effort is worth it because they are absolutely delicious.

A. Cookie Top#

Ingredients:

37g bread flour

30g unsalted butter (room temperature)

37g sugar

Method:

1. Mix butter with sugar using spatula until combined. Then add in flour and mix thoroughly until a dough is formed.

2. Transfer to parchment paper, cover with another piece of parchment paper and roll to 2mm thick. Alternatively, put the dough in a plastic bag and roll to 2mm thick. Chill in fridge. 

3. Use cookie cutter (diameter of the pastry puff) to cut out cookie top. If too soft to lift up, put in the freezer for a few mins. 

B. Choux Cream*

Ingredients:

2 egg yolk 

50g sugar

pinch of salt

12g cake flour

12g corn flour

240ml fresh milk

180g whipped cream

1 tsp vanilla extract

30g butter (optional)

1 tsp Contreau liquor

Method:

1. Lightly beat egg yolks, then add sugar and whisk to combine.  Then add salt and whisk until pale. 

2. Add cake and corn flour and whisk until light yellow in colour.

3. Heat up milk to 80 deg cel, pour into the egg mixture in two batches. Whisk thoroughly to combine. 

4. Sieve the mixture into a small pot and simmer. Stir using the same whisk continuously and quickly until mixture is shiny and smooth and liquid. This takes about 5 mins. Note that the mixture will become thick as you stir before it turns more fluid. When the whisk is lifted, the mixture drips. Note: The mixture will also be bubbling away as you stir and it is ok.

5. Stir in butter (optional) until it has melted and incorporated.

6. Remove from heat and cool the cream by putting the pot over a container filled with ice/ice pack. Cover the surface of cream with cling wrap and chill in fridge for at least 2 hours. After 2 hours, add vanilla extract and contreau liquor, and whisk/beat to loosen the cream until it is smooth.

7. Whisk whipped cream until soft peak. Add whipped cream to step 6 and use spatula to fold. No need to combine completely.

8. Transfer the cream to piping bag and chill in fridge for at least 1 hour.

C. Choux Pastry

Ingredients:

130ml water

50g unsalted butter

1/4 tsp salt

70g plain flour (sieved)

2 eggs, 65g with shell (lightly beaten)

Method:

1. Put water, salt and butter into a small copper pot with long handle, and boil over low heat to melt the butter. Once butter has melted, increase stove heat to medium and bring to a boil. Once boiled, remove from heat and immediately add flour all at once. Use a silicon spatula to mix quickly into a dough until there is no flour left. 

2. Put the pot back on the stove over medium heat, flip and press the dough until a thin film forms on bottom of pot. Note: puff will not rise well if dough is not heated enough.

3. Transfer the dough to a new mixing bowl. Spread out the dough to help it cool down faster.

4. Once dough is 40 to 60 deg celcius, add in the eggs in 3 batches and mix thoroughly after each addition. Observe the consistency of the batter after each addition of egg. The batter is perfect consistency when a V smooth shape is formed when the spatula is lifted from the batter and the batter is thin and flows down slowly. If more egg is required to achieve the desired consistency, mix in the leftover egg whites (from making the choux cream) little by little.

5. Transfer the batter to piping bag.

6. Preheat oven to 200 deg celcius and line baking pan with parchment paper.

7. Cut piping bag tip (1cm across) and pipe the batter on the baking pan. Put cookie top on each batter. Do not open oven during baking or the puff will collapse. 

- Bake at 210 deg cel (no fan), then 180 deg cel (no fan) when the puff has peaked

- Bake at 180 deg cel for 15min, 130 deg cel for 15 min (Chef Pastissier Masayoshi Ishikawa)

- Bake at 200 deg cel for 15min, 170 deg cel for 10 min

- Bake at 190 or 200 deg for 20min (Nino's home)

after baking, leave the puffs in oven for 10min to turn crispy.

Transfer to wire rack to cool. Note: choux pastry is properly baked when you can see a little protusion at the bottom of each puff.

8. Use the tip of a chopstick to make a little hole on the side of each puff, then pipe cream into the cream puffs and refrigerate until ready to serve.

* Other fillings:

a. Oreo cream cheese filling:

Ingredients:

300g cream cheese (room temp)

35g sugar

170g whipped cream

1/4 cup oreo crumbs

Method:

1. Mix sugar with cream cheese until creamy and smooth.

2. Whisk the whipped cream until medium peak.

3. Add the whipped cream into the cheese mixture and whisk until well combined and smooth.

4. Fold oreo crumbs into the cream and transfer to piping bag.

b. Earl Grey filling: 

Add 2 teabag to step 3 when making the choux cream.

c. Taro cream filling:

400g taro (steamed 20 min and mashed)

90g sugar

10g vanilla

489g whipped cream

# Earl Grey Cookie Top

2g tea leaves

25g sugar

30g butter

40 cake flour

Sunday, December 4, 2022

Chicken Pot Pie


Crispy, flaky crust chicken pot pie is our family's comfort food.


Ingredients:

Chicken Filling

1 chicken (around 1 kg, which yields 460g meat) or 4 chicken thighs)

2 medium size potatoes (320g)

1 carrot (140g)

half large onion

2 cloves garlic


Short Crust Pastry (for 9" pie)

270g plain flour 

150 cold butter

1 egg yolk (18g)

50ml cold water

1/4 teaspoon salt


Method:

A. Chicken Filling

1. Debone chicken. Marinade with 1 tablespoon olive oil, 3/4 teaspoon salt and dashes of black pepper for 1 hour. Pan fry the chicken until it is cooked. Set aside to cool, then shred the meat.

2. Cut the potatoes and carrot into small cubes, boil in salted water until they are tender. Drain and set aside. Save the water for step 3 below.

3. Saute onion and garlic in olive oil until fragrant. Add chicken, potatoes and carrot, and mix in. Add 2 teaspoon herbs (thyme, oregano, parsley, basil), 1 teaspoon paprika, and dashes of black pepper. Stir fry until combined. Add 2 tablespoons plain flour and stir to mix in evenly. Add 250ml water (from boiling potatoes and carrot) and 20g butter, and mix in. Simmer for 5 minutes, and it is done!


B. Short Crust Pastry

1. Sieve flour into mixing bowl and add salt. Mix them up.
2. Add butter and use fingertips to rub into flour until it resembles breadcrumbs. You can also use a dough cutter to cut the butter into the flour.

3. Combine egg yolk with cold water and pour into the flour mixture one tablespoon at a time, using a fork to combine gently. Stop adding water when the mixture forms clusters. Use your hands to gather the mixture gently to form a ball. Divide the ball into 2/3 (for pie crust) and 1/3 (for pie lid) and wrap them up individually with plastic wrap. Once wrapped, gently pressed the dough to make a disc (2cm thick), and chill in the fridge for at least one hour. Dough weight: 486g.

4. Place a silicon mat on work surface, and lightly flour the mat. Remove the dough from fridge and place it on the mat. Place a piece of plastic on the dough and roll the dough to fit the pie/tart pan. Gently transfer the dough into the pie/tart pan. Press the dough into the pan and trim off the excess dough from the edge. Prick the base with a fork. Chill the dough in fridge for at least 15 minutes. 

5. Preheat oven to 170 deg celsius. Place pie weights into the dough. Bake the pie crust for 20 minutes or until golden brown.

6. Roll out the remaining 1/3 dough to make pie lid. You can cut the dough into strips to create lattice pattern. Chill in fridge.

C. Assemble

1. Spoon filling into the pie. 

2. Remove the pie lid from the fridge and cover the pie. Use a fork to gently press the edge to make a good seal. Make some cuts on the surface of the lid to help release steam during baking. Brush the pie lid with egg wash.

3. Bake at 170 deg celsius for 25 minutes or until golden brown.

4. Transfer the pie to wire rack for a few minutes before serving.

Thursday, November 24, 2022

Blueberry Oatmeal Scones

蓝莓麦片司康


What do you do with the oatmeal pulp after making oatmilk? I use them to make delicious and fluffy oatmeal scones. 


Ingredients:

90g plain flour

60g oatmeal pulp

1 teaspoon baking powder

1/2 tablespoon sugar

1/8 teaspoon salt

25g unsalted butter (cold and just out from fridge, cut into small pieces)

20g cold milk 

10g dried blueberries


Method:

1. Sieve flour with baking powder into mixing bowl. Add sugar and salt and mix roughly with a fork.

2. Add cold butter and use your fingers to quickly but gently rub the butter into the flour until the mix looks like breadcrumbs.

3. Add oatmeal pulp and dried blueberries. Use fork to mix in.

4. Add milk and use fork to mix until dough just come together (ok to have small bits of flour).

5. Turn the dough to lightly floured tabletop and use hands to lightly press and level the dough to about 2 to 3cm thick Do not over mix.

6. Wrap the dough with cling wrap and chill in fridge for 30minutes.

7. Cut the scones to your favourite shape (round, square or triangle) or lightly shape with hands. If you use a cookie cutter, gather the trimmings together and lightly press/level again to cut more scones.

8. Arrange scones on a lightly greased tray and brush with olive oil (or milk). Bake at 190C for 20 mins or until golden brown. Transfer to wire rack to cool.


Good with a cup of cofee or tea. 😋


Friday, August 5, 2022

Sourdough Scones

天然酵母司康

Ingredients (4 scones)

120g plain flour

1 tsp baking powder (omit if using self raising flour)

60g sourdough starter, discard/unfed, straight from fridge

1 tbsp sugar 

40g fresh milk

50g unsalted butter (very cold)

1/8 tsp salt 


Method:

1. Sieve flour and baking powder into mixing bowl. Add sugar and salt and mix roughly with a fork.

2. Add cold butter and use your fingers to quickly but gently rub the butter into the flour until the mix looks like breadcrumbs.

3. Add milk and starter, and use fork/dough scrapper to mix until dough just come together (ok to have small bits of flour). Don't overmix or knead the dough.

4. [Optional] Turn the dough to lightly floured tabletop and use hands to lightly press and level the dough to about 2 to 3cm thick. Do not over mix.

5. Wrap the dough with cling wrap and lightly flatten it into a disc of about 2 to 3cm thickness, then chill in fridge for 30minutes. I pre-shaped the dough into a square so that I can cut them up into square pieces later.

6. Preheat oven 200°c, fan mode.

7. Cut the scones to your favourite shape (round, square or triangle) or lightly shape with hands. If you use a cookie cutter, gather the trimmings together and lightly press/level again to cut more scones.

8. Arrange scones on a lightly greased tray and brush with olive oil (or milk). 

9. Bake for 15 mins or until golden brown. Transfer to wire rack to cool.


Saturday, April 23, 2022

Basic Scones

司康 / 比司吉


These scones are wonderfully buttery and flaky. They are sweet enough to be eaten on their own without jam, butter or clotted cream. 

Ingredients:

180g plain flour

1.5 teaspoon baking powder

1 tablespoon sugar

1/8 teaspoon salt

50g unsalted butter (cold and just out from fridge, cut into small pieces)

100-110g cold whipping cream (just out from fridge)


Method:

1. Sieve flour with baking powder into mixing bowl. Add sugar and salt and mix roughly with a fork.

2. Add cold butter and use your fingers to quickly but gently rub the butter into the flour until the mix looks like breadcrumbs.

3. Add whipping cream and use fork to mix until dough just come together (ok to have small bits of flour).

4. Turn the dough to lightly floured tabletop and use hands to lightly press and level the dough to about 2 to 3cm thick Do not over mix.

5. Wrap the dough with cling wrap and chill in fridge for 30minutes.

6. Cut the scones to your favourite shape (round, square or triangle) or lightly shape with hands. If you use a cookie cutter, gather the trimmings together and lightly press/level again to cut more scones.

7. Arrange scones on a lightly greased tray and brush with olive oil (or milk). Bake at 190C for 20 mins or until golden brown. Transfer to wire rack to cool.


Good with a cup of cofee or tea. 😋


Tuesday, March 15, 2022

Pineapple Tart

 黄梨挞 /   凤梨酥


Pineapple is called "Ong Lai" in Hokkien dialect, literally translated as "Prosperity Come". To welcome Chinese New Year, many Chinese families would thus love to have pineapple tarts. These tarts are symbols of prosperity, good luck and good fortune. 

Homemade pineapple tarts are the best as we can control the sourness or sweetness of the pineapple jam, as well as how buttery we want the pastry crust to be. Here is my version of buttery and melt in the mouth pineapple tarts.

Pineapple Jam 

(one fresh ripe pineapple makes 6g fillings for about 30 tarts)

(2 pineapples weighing 2.44kg makes 461g jam.)

Cut the pineapple skin and remove the 'eyes' from the flesh. Cut the pineapple into big wedges. Do not cut away the core or hard stem in the centre at this moment as it will facilitate grating.


Grate the pineapple and discard the core/hard stem.

Cook the pineapple flesh together with the juices in a wok over medium-low heat. I did not add spices like cloves or cinnamon as I just want pure pineapple fragrance. Stir from time to time until the juices have reduced. Once 75% of the juices have evaporated, add rock sugar or granulated sugar according to how ripe the pineapples are (approximately 30g to 50g per pineapple), and stir the pineapple flesh frequently to avoid burning the jam. Note: Optionally, can add lemon juice which acts as a natural preservative (around 1 tsp per pineapple) and/or maltose (1 tsp per pineapple). Once the jam has thickened (i.e. can stick to the spatula) and golden brown in colour, the jam is done. It takes about 2.5 hours (from cutting, grating to cooking) for the pineapple jam to be ready. Store the jam in a sterilised air tight container once it has completely cooled down.


Roll the jam into balls of 6g each, and keep in fridge.

Note: Because homemade pineapple jam does not contain preservatives and usually uses lesser sugar, they cannot last too long. So it is best to make the jam as well as the pineapple tarts one week before Chinese New Year.


Pineapple Tart Pastry

Ingredients (makes about 35 tarts of 10g dough each):

125g unsalted butter (soft to the touch, around 20 degree celcius) - I use Golden Churn brand butter.

180g plain flour

10g corn starch (1 tablespoon)

1 egg yolk (15g)

20g icing sugar

1/8 tsp salt

1 spoonful of love

Method:

1. Sieve plain flour and corn starch together and set aside.

2. Whisk the butter in mixing bowl, then add icing sugar and whisk until the butter is pale/white in colour. This takes about 2 to 3 minutes of hand whisking.

3. Add salt and egg yolk, and whisk until just combined. 

4. Add in sieved flour and use spatula to mix using cutting and folding motion. Stop mixing when there are no more flour. Lift dough and throw back into mixing bowl for 5 times. Overmixing will cause the dough to be hard. Lightly press the dough with your finger, and if it does not stick to your hand, rest dough in fridge for 30mins and it is ready. From here, you can either do an open faced pineapple tart or round shaped (ball) tarts.


Open Faced Tarts

5a. Place the dough on a lightly floured bench, and roll it to 5mm thickness. Lightly flour the pineapple tart cutter, cut the dough carefully and place in a baking tray. 

6a. Egg wash the tarts and bake them at 180 degree celcius for 10 mins. Remove from oven and place the balls of pineapple jam on each tart. Return the tray to the oven and continue to bake for another 10 mins. Once the tart is golden in colour, remove the tray from the oven and lightly press on the pineapple balls so that the jam will stick to the tart.


Round Shaped Tarts

5b. Weigh the dough and ensure each is 9g each. Roll into ball, flatten it and place the pineapple jam ball in the middle. Bring the edges of the dough together and seal. Gently roll it in between your palms to shape it into a ball. Optional: Score criss-cross pattern to resemble pineapple skin on the ball using scrapper to make them look like pineapples!

6b. Bake the tarts at 160C (fan mode) for 8minutes. Then, glaze the top of the tart with egg wash (1 egg yolk + 1 teaspoon of milk or half teaspoon cooking oil) and bake at 150C for another 10-12minutes (without fan mode) or until tarts are golden brown.


7. Cool completely before storing the tarts in containers. To prevent the tarts from sticking to each other, lay a piece of baking paper liner between each layer of tarts.


For nastar shape:

  1. Put the dough into nastar piping tip, and then press out into a strip of 5cm length. 

  2. Place pineapple filing at one end and roll up the pastry, as in a Swiss roll, enough to enclose the jam. Do not overlap the pastry. Cut off the excess pastry.


Wednesday, September 22, 2021

Glutinous Rice Peanut Puff / Lor Mai Kok Chai

糯米角仔

I learnt to make this cantonese sweet treat from my late mother in law. It is a must have in our family for Chinese New Year. Unlike the traditional peanut puffs which are made using plain flour, this is made using glutinous rice flour and wheat flour. They are super crispy and you can't stop at one!


Ingredients

Dough

300g glutinous rice flour

75g wheat starch 澄粉

25g sugar

1/2 tsp salt

75g pork lard (alternative: cooking oil)

330ml boiling water

1 spoonful of love

Filling

100g coarsely chopped/grounded roasted peanuts 

20g lightly toasted white sesame seeds

50g sugar

1 pinch of salt


Method

1. Sieve the glutinous flour and wheat starch into a mixing bowl and mix in salt. Make a well in the center of the flour and set aside. 

2. Add pork lard and boiling water into the mixing bowl, and use chopsticks to mix quickly. Then use hand to  knead until you get a smooth dough. Cover the dough with a damp cloth and rest the dough for 20-30 minutes. 

3. Mix the ingredients for the filling and set aside.

4. Remove some dough and keep the rest covered under damp cloth. Roll the dough flat to about 2mm thickness and use a round cookie cutter to cut the dough. My cookie cutter size is 4.5cm in diameter. 


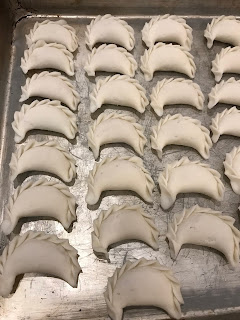
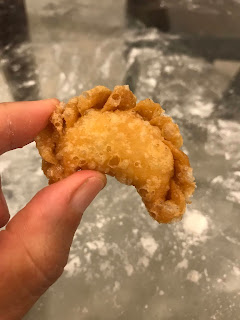
5. Take one of the round dough, put half to one teaspoon (depends on the size of your cutter) of peanut filling in the center of the dough. Gently seal and pleat the edges of the dough into mini "curry puff" shapes. Use a plastic sheet/cloth to cover the puffs until all the dough has been shaped. 


6. Fry the puffs in medium-high heat until golden brown. Cool them completely before storing them in air tight containers.