Saturday, December 30, 2023

Crispy Bacon Croquette

脆皮马铃薯饼


Enjoy these delicious fried potato patties by themselves or as a side dish. 

Ingredients

1 kg Indonesian Brastagi potatoes (870g after mashing)

1/2 egg (optional)

6 to 8 slices of smoked bacon, cut into 1 m strips. (Can replace with other filling e.g. minced beef/pork/chicken)

1 tsp salt

Dashes of black pepper

1 tsp dried herbs

50g plain flour 


Method:

1. Peel and cut potatoes into small cubes. 

2. Boil* the potatoes in salted water until tender (can poke through with a chopstick), around 10 to 15minutes. Drain water and return the pot of potatoes to the stove. On low heat, shake the pot to evaporate excess moisture from the potatoes. Turn off heat and mash the potatoes while they are hot. Leave some small chunks of potatoes for texture (personal preference). If the mashed potatoes are wet (i.e. sticks to your hand), add plain flour one tablespoon at a time.


3. While boiling potatoes, pan fry the smoked bacon strips until crispy and set aside.

4. Add seasoning and smoked bacon and mix well. Shape the patty and rest in fridge for 30 minutes (to prevent the croquettes from exploding while deep frying). Remove patty from fridge 30 minutes before frying.

5. Prepare beaten egg, plain flour and panko. Deep fry in batches. Dredge each patty in each batch through plain flour, followed by egg and panko. Deep fry immediately until light golden brown in colour.  Transfer to wire rack or kitchen towel to drain excess oil. Use a mesh strainer to remove panko bits floating around in the oil before frying the next batch. This will keep the oil clean and produce nice and golden patties.

6. Serve immediately.


* you can also pre cook the potatoes by deep frying them. To do this, slice the potatoes in step 1. Then deep fry them until soft.


Prawn Noodle (Soup Based)

 虾面


I love to eat prawn noodles and to me the real test for a good bowl is in the soup and the prawns. The soup in some of the prawn noodles sold in hawker centres and coffee shops are too sweet (I think they put too much sugar to sweeten the soup stock) or lack prawn unami flavour, or the prawns are small, not fresh or too few. 

After coming across Wendy's recipe for prawn noodle and a couple of others (here and here), I came up with my version and it was a success. 

Ingredients (serves 4 pax):

A. Prawn soup:

Prawn shells from 1kg prawns 

2 garlic cloves (chopped - for frying prawn shells)

2 shallots (chopped - for frying prawn shells)

Chicken carcass or feet

2.5litres water

1/2 tsp white/black peppercorns

1/4 tsp white pepper powder

3 garlic cloves (smashed, with skin)

2 star anise petals

1/2 tbsp dark soy sauce

1 tbsp fish sauce

pork skin (optional)


B. Toppings: 

prawns

pork lard

fried shallots 

pork slices (lean meat or pork belly) 

1 bundle of kang kong / water spinach (about 300g) - pluck the leaves and select the tender stems, washed and set aside


C. Noodles:

Rice vermicelli, 200g (soaked until soft, then drain and set aside)


Method:

1. Wash, peel prawns and de-vein. Chill the prawns in fridge.

2. Prepare pork lard. Refer to this post.

3. Prepare fried shallots: Peel and sliced 5-6 shallots, then fry using pork lard until golden and crispy. 

4. Prepare prawn soup: 

4.1 Blanch the chicken carcass and feet in boiling water. Remove the chicken carcass and feet, and set aside. Discard the water.

4.2 Put water into a big pot and bring to a boil. Add the chicken carcass and feet, as well as the whole piece of pork/pork belly into the pot. Fish out the pork/pork belly after 10minutes. Sprinkle some salt over the pork/pork belly. When the pork has cooled down, slice thinly and set aside.

4.3 Fry shallots and garlic using pork lard until fragrant, then add in prawn shells and stir fry until the shells turned pink, dry and very fragrant. Transfer the shells into the pot and add in cloves, star anise petals, peppercorns and pepper powder, and bring to boil again. Once boiled, lower heat to medium and simmer for 1 hour. After 1 hour, season the soup with dark soy sauce and fish sauce.

5. Bring the soup back to a boil and put in the prawns and sliced pork/pork belly. When the water comes to boil again, fish the prawns and pork out, and set aside.

6. Heat the wok with water and bring to a boil. Put the rice vermicelli in a metal strainer and lower into the boiling water. Cook according to package instructions and transfer to serving bowls. Drizzle some pork lard or oil from frying shallots over the cooked rice vermicelli, and use chopsticks to mix in.

7. Using the same water for cooking the rice vermicelli, put in the kang kong and blanch for 5 minutes. Drain the vegetable and transfer to the serving bowls. Add the prawns and pork into the noodle bowls.

8. When it is time to serve, re-boil the soup and ladle the soup through a sieve into the noodle bowls. Top up with pork lard and fried shallots. Serve hot!

Tuesday, December 26, 2023

Braised Pork Belly

 扣肉包


Adapted this recipe by Chef Yeung Koon Yat.

Ingredients (serves 4 pax)

600g pork belly

1 bunch of spring onions

1 knob ginger, peeled and smashed

1 small piece of tangerine, about 2 cm

5 tbsp light soy sauce

1 tbsp dark soy sauce

3 tbsp Chinese rice wine (I used Shaoxing wine)

45g rock sugar

400ml water

1 tsp rice vinegar

1/4 tsp fish sauce


Method:

1. Blanch pork belly in boiling water to remove surface scums, or sear the pork belly (all sides) on high heat using a cast iron pan.

2. Place ginger, spring onion and tangerine peel in a pot. Place pork belly (skin side down), add soy sauce, rice wine and rock sugar, and cover the pork with water. Bring to boil, then lower heat and simmer for 1 hour or until pork is tender. Flip the pork belly at halfway mark.


3. Remove pork belly from pot and set aside. 

4. Add rice vinegar and fish sauce to the pot. To thicken the sauce, continue to cook it and then stir in corn flour slurry.

5. Slice the pork belly and serve with vegetables (e.g. kai lan) or lotus leaf bun. Refer to my post here on how to make lotus leaf bun.


Saturday, December 2, 2023

Potato Salad


Recipe adapted from: Brian Lagerstrom

Ingredients

350g potatoes

1/2 teaspoon salt

2 to 3 tablespoon extra virgin olive oil

2 to 3 strips of smoked bacon

2 teaspoon light sour cream

3  tbsp shredded cheddar cheese


Method

1. Wash and partially peel potatoes (i.e. leave some potato skin for better texture). Cut into bite sized, and mix in olive oil and salt thoroughly. Roast the potatoes @200 degree celcius until 1 to 2 sides of the potatoes are crisped, around 25 minutes. Make sure to stir the potatoes half way through roasting. Set aside the potatoes to cool down.


2. Cut smoked bacon into 1cm stripes. Pan fry them until crispy.  Transfer the bacon together with the rendered fat to the potatoes. Chill in fridge in air tight container if the salad is prepared ahead.

3. When you are ready to serve the salad, mix in sour cream, mayonnaise, cheddar cheese, spring onions and black pepper. Toss and mix thoroughly. Best served warm.


Monday, November 27, 2023

Homemade Kaya

香兰咖椰


Kaya is a sweet and creamy/custardy jam made from coconut milk, eggs and sugar. It is served in toast with butter in most coffee stalls. Kaya comes in two flavours: pandan or caramel. I'm sharing the recipe for pandan kaya which is less sweet. 


Ingredients

6 large eggs (355g nett)

360ml fresh coconut milk

100g sugar

5 pandan leaves


Method

1. Prepare pandan extract: Cut pandan leaves into small pieces and put into blender with 100ml of the coconut milk. Sieve the mixture, squeeze the pulp to extract as much pandan liquid as possible. Discard the pandan pulp thereafter.

2. In a container/bowl, lightly beat the eggs and sugar until sugar dissolves. Sieve the egg mixture into a small pot, add in the pandan extract and the remaining coconut milk. Stir using a small whisk to combine.

3. Set up bain-marie: Prepare a big pot and put a steaming rack in it. Fill up with water until it just covers the steaming rack. Place the small pot with coconut egg mixture on the steaming rack (so just a small amount of water touched the bottom of the small pot), turn on the stove heat and bring the water to a boil. Then lower heat to medium-low and keep stirring the coconut egg mixture in one direction. Note: High heat will cause the coconut egg mixture to curdle and kaya will be lumpy.


4. It took me 1.5 hours to cook down the mixture and get my preferred thick and custardy texture and consistency. Remove the small pot from bain-marie once done and continue to keep stirring at room temperature to cool the kaya down. Once completely cooled, store in a clean and sterilised jar and refrigerate. Best consumed within 2 -3 weeks.


Tuesday, November 21, 2023

Focassia

意大利香料面包 (佛卡夏)


Made this fluffy herbs focassia today! Recipe is from Peng Fudong and I made half portion using a 19cm x 19cm square baking pan to achieve a tall bread.


Ingredients:

500g bread flour

325g warm water

9g salt

3g instant yeast

75g water (to be added slowly in 3 batches)

35g olive oil

olive oil & water mixture ratio: 1:1 (for oiling baking tray/pan, dipping your fingers into the dough to make dimples)


Method:

1. Put flour, yeast and warm water into the mixing bowl. Use a dough attachment to knead the dough (slow speed first, then medium) until it comes clean from the sides of the mixing bowl.

2. Add water into the mixing bowl in 3 batches. For each addition, knead using slow speed first to avoid water splashing out of the mixing bowl. Make sure water is fully incorporated into the dough before adding the next batch of water.

3. Add olive oil and knead until fully incorporated. Do window pane test.

4. Lightly coat the baking pan with olive oil & water mixture, and line it with parchment paper. Transfer the dough to the baking pan, fold the dough onto itself (i.e. gently lift the edges of the dough and fold it towards the centre), flip the dough and tuck in the edges of the dough to make it rectangular. Cover the pan with clingwrap or cloth and proof for 30 minutes. At the 30th minute mark, repeat the folding (to incorporate air into the dough) and continue to proof for another 30 minutes.

5. Dab fingers in the olive oil & water mixture and gently spread the dough to cover the baking pan. Cover with clingwrap or cloth and proof for 1 hour.

6. Dab fingers in the olive oil & water mixture and gently press into the dough to create dimples. Add toppings (e.g. herbs, olive) and sprinkle salt.

7. Bake at 180 degrees celcius for 25 minutes. Transfer to wire rack to cool.


Note: To make olive oil soaked cherry tomatoes, cut 250g tomatoes into half, mix in olive oil and dried/fresh herbs, then roast in oven at 150 degree celcius until almost dry.


Thursday, November 9, 2023

Fried Fermented Bean Curd Chicken Wings

炸鸡翅膀


Fermented bean curd is a type of preserved tofu. There are 2 types - white and red. This recipe uses the red fermented bean curd which makes the chicken wings very aromatic and fragrant. And crispy too!

Recipe credit: Fried Red Bean Curd Chicken Wing (Nam Yue Chicken Wing) - MyKitchen101en.com

Ingredients

8 chicken wings

1 tablespoon rice flour

1 tablespoon cornstarch

Marinade:

30g red fermented bean curd (2 pieces including some liquid)

1 clove garlic (grated)

1 shallot (grated)

1 medium egg or 1/2 large egg

1/4 tsp sesame oil

1 tablespoon sugar

1/4 tsp salt


Method:

1. Wash and clean the chicken wings, then dab dry with kitchen towels. Pierce the chicken wings with a sharp knife.

2. Prepare marinade and add them to the chicken wings. Ensure the wings are well coated with the marinade. Set aside for at least half hour - the longer you marinade, the better the taste.

3. Heat up cooking oil in wok under medium-low heat.

4. Mix the rice flour and cornstarch, then add them to the marinated chicken wings. 

5. When the oil temperature has reached approximately 160 deg celcius, put in the chicken wings and fry until light golden colour. Turn up the heat to medium-high and continue to fry the wings until golden in colour, about 30 seconds. Transfer the fried chicken wings to a wire rack to drain excess oil. Note: fry the chicken wings in batches.


6. Serve the fried chicken wings hot.

Thursday, November 2, 2023

Condensed Milk Bread

煉乳牛奶面包


If you have condensed milk and fresh milk in your fridge, I highly recommend that you bake this bread. It is very soft and fluffy  even up to the 3rd day after baking.


Ingredients:

280g Bread flour

10g Sugar

4g salt

210g Fresh milk

10g condensed milk

4g instant yeast

28g unsalted butter


Method:

1. Dissolve condensed milk in half of the fresh milk, and set aside.

2. Put all ingredients (except butter and salt) into mixing bowl. Knead at medium speed until the ingredients come together to form a pliable ball of dough, around 10minutes.

3. Add butter and salt, and knead for another 10minute until dough is smooth and elastic. Do window pane test (for gluten development). Once window pane is achieved (refer to picture below), lightly grease a mixing bowl with olive oil and transfer dough to it. Cover the mixing bowl and let it proof at room temperature for 1 hour or until double in size, whichever is earlier. 

4. Punch down the dough (528g) and divide it into portions (depending on size of your baking tin), shape and proof for 30-40min until double in size until dough reaches 90% of tin capacity - around 45min to 1 hour. I've tried proofing under the size of the dough exceeds the tin capacity (refer to picture below), and it is still fine.

5. Press dough lightly, if the dent stays means ready to bake. Egg or milk wash the top of the dough, then bake 180deg cel (fan mode) for 30 minutes at lowest rack in oven.

6. Cool the bread on wire rack.


This is the crumb shot:


Wednesday, November 1, 2023

Bread (single proof)

吐司 (一次发哮)


If you have whipping cream that is about to expire, and want a loaf of bread quickly (in less than 2 hours), you can try to bake this Killer Toast recipe by Victoria Bakes. The bread is very soft and fluffy especially when it is out of the oven. On second day though, it will not be as soft, but still nice. The bread is quite dense and I think it may be more suitable to make small buns instead of bread loaf.


Ingredients

260g bread flour

3g yeast

5g salt

20g sugar

30g butter

160g to 180g egg mixture (don't dump all in):

whipping cream + milk + egg. If whipping cream is more than 80g, can omit butter.

or

milk + egg

1. Prepare/weigh the egg mixture.

2. Put all ingredients (except butter and salt) into mixing bowl. Leave 10-20% egg mixture and add in only when the dough is dry. Knead at medium speed until the ingredients come together to form a ball of dough. 

3. Add butter and salt, and knead for another 3.5min until dough is smooth and elastic. Do window pane test (for gluten development), divide into portions (depending on size of your baking tin), shape and proof for 30-40min until double in size until dough reaches 90% of tin capacity - around 45min to 1 hour. This recipe only requires a single proofing.

4. Press dough lightly, if the dent stays means ready to bake. Egg or milk wash the top of the dough, then bake 180deg cel for 45 minutes at lowest rack in oven.

5. Cool the bread on wire rack.


Monday, October 9, 2023

Minced Chicken Patty

鸡肉饼 

For a healthier meat patty, you can try making this using minced/ground chicken meat. 


Ingredients (makes 4 patties, 1.5cm thick each)

500g minced chicken

1 egg

20g to 100g semolina or panko bread crumbs

70g grated parmasen cheese 

1 teaspoon garlic powder

1 teaspoon dried oregano

1/2 teaspoon salt

1/4 teaspoon white pepper


Method:

1. Put all ingredients in a mixing bowl and mix well with hand. If mixture is too sticky, put in fridge for 30minutes before shaping, or oil your hands lightly.


2. Shape the meat mixture into 4 patties and set aside for half hour.

3. Pan fry the patties until each side is golden brown. Serve with greens or in a burger. Yum!


Monday, August 28, 2023

Pesto Paste

香草酱


Ingredients (makes 130g, enough for 2 servings [70g] of pesto pasta)

45g toasted pine nuts

30g sweet basil (leaves only, no stems)

6g parsley (leaves only, no stems)

30g grated parmesan cheese

60g extra virgin oil (cold, refrigerate for 20mins)

1.5g salt

9g lemon juice


Method

Blend all together in blender for 20 seconds or until well blended together. Done! It's that easy.


To serve, cook your favourite pasta, cut some cherry tomatoes and throw in a few pieces of mozarella cheese balls and mix in generous amounts of pesto. Like this:


Recipe adapted from : Brain legerstrom youtube video, pasta salad 3 ways


Thursday, August 10, 2023

Fried Calamari


If you didn't already know, calamari is the Italian word for squid. This recipe will produce the cripiest calamari you've ever had. The calamari will stay crispy for at least one hour!

Ingredients:

500g Squids

Marinade:

Dashes of onion powder and garlic powder

1/2 teaspoon salt

Batter:

6 tablespoon self raising flour (or 6 tablespoons plain flour with 1 teaspoon baking powder)

3 tablespoon cooking oil

6 to 8 tablespoon water

Tapioca flour

Plain flour

Method:

1. Prepare batter: Mix flour with cooking oil. Then add water slowly until you get a smooth and thick batter. Set aside for half hour. 

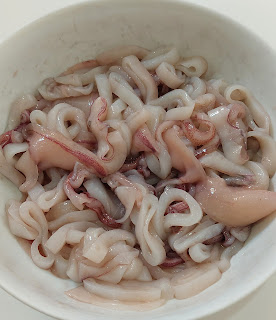
2. Wash and clean the squids. Slice the squids into 1cm thick rings. Lightly rinse with salted water and drain.

3. Heat wok with enough soil for deep frying. Use a chopstick to test the oil temperature. When there are bubbles around the chopstick, it is ready.

4. Mix the batter into the squid thoroughly. 

5. Take a small batch of squid and add in tapioca flour (90%) and plain flour (10%). Quickly dredge the squid rings through the flour and coat thoroughly. Shake off excess flour and deep fry the squids immediately over high heat. Do not turn the squids or break up the clump of squids until the squids have turned light brown in colour. Once the squids turn crispy and golden, transfer to wire rack or kitchen towel to drain excess oil. After each batch of frying, scoop up the crumbs of flour from the oil using a fine mesh sieve.


6. Garnish with chopped parsley (optional) and serve! Enjoy.


Wednesday, July 26, 2023

Yee Fu Noodle

伊府面


Love this dish during Chinese Wedding Dinner. It is actally very easy to cook either as a vegetarian (no meat) dish or one with your favourite meat/seafood.


Ingredients :

200g Ee-Fu Noodles

3 cloves garlic minced 

150g lean pork (sliced)* 

300g squids (sliced)*

1 carrot sliced thinly

Seasonal vegetables (chye sim, chives, cabbage)

pork lard (optional)

* can replace with roast duck (shredded) or seafood (prawns//lobster)

Sauce :

300ml chicken stock

1 tablespoon shaoxing wine 

2 teaspoon dark soya sauce 

2 teaspoon light soya sauce 

1 teaspoon sesame oil 

1 teaspoon salt 

1 teaspoon white pepper 


Method :

1. Boil the noodles in boiling water for 2 minutes. Remove and rinse under cold water. Drain and set aside.

2. Heat 2 tablespoons oil in a wok under high heat. Add in minced garlic and saute until aromatic. Add in pork slices. Stir fry until pork is slightly brown and add in vegetables, carrot and squids. Stir fry for one minute. Add the chicken and sauce and bring it to a boil. 

3. Add the noodles and keep stir frying under medium heat until the noodles absorb all the liquid. Mix in the fried garlic.

4. Dish out and serve with pork lard. Enjoy!